

Showing posts with label 2011 quilts. Show all posts
Showing posts with label 2011 quilts. Show all posts
Tuesday, December 27, 2011
in the home stretch!
I'm looking down the slippery slope of a fully scheduled January, so it was fairly important to get this autumn quilt finished before the end of the month. My initial goal of finishing in November flew by with an exhilirating rush that almost made me forget my sprained ankle, but the year-end deadline is much more ominous and imposing.


Tuesday, December 13, 2011
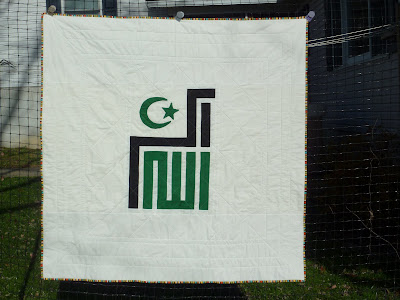
Stitching along
Look familiar?

 Yup, the quilting is more than half done on my current legacy quilt project. I'm very tickled with how it's turned out so far.

 Yup, the quilting is more than half done on my current legacy quilt project. I'm very tickled with how it's turned out so far.
Friday, December 9, 2011
Finish it Up Friday!
I finally have a bona fide newly finished piece for Finish it up, Friday! Sure, I actually finished it last Saturday, be since this calls for anything finished since lasat Friday, I'm in! I apologize for the shabby pictures, but I finished this a whopping nine hours before I was due to hand it over to the recipients. Behold, a King-sized wedding quilt!
 The Block pattern is a Friendship star, although I've also seen this pattern with a four-patch instead of a solid block in the corners called a Chinese coin (heaven knows why):

It is finished with a 5" border down each long side and a 10" border at the top and bottom in contrasting fabrics, and then an additional 5" border in the pebble/bubble fabric around all sides. The backing is two panels of the tile print split by a panel of pale blue that is a matching fabric to the pale blue in the HSTs on the front:

 The Block pattern is a Friendship star, although I've also seen this pattern with a four-patch instead of a solid block in the corners called a Chinese coin (heaven knows why):
It is finished with a 5" border down each long side and a 10" border at the top and bottom in contrasting fabrics, and then an additional 5" border in the pebble/bubble fabric around all sides. The backing is two panels of the tile print split by a panel of pale blue that is a matching fabric to the pale blue in the HSTs on the front:

I quilted this very simply, with a fairly open diagonal stitch for the patchwork area on the front and stippling in the borders. Hopefully it will keep my newlywed friends nice and warm on their mountain this winter.
Saturday, November 19, 2011
Squeezing in more critters for November
As much as I love the texture of a heavily quilted quilt, I also love the puffiness of a lightly quilted one. In fact, the quilt that lives on my bed all summer is one that my great-grandmother made before I was born, and which she quilted with warm wide pockets.
The quilt I just finished has a similar effect. The request was for it to finish as a very warm quilt, which means minimum quilting. The quilted squares in the center portion are set on the diagonal, and measure six inches on each side. The borders are quilted in the ditch, so they'll achieve excellent plumpiness after a dozen or so washes:

You can see the pattern well on the back - I quite like the way the corners came together, simple but strong lines:
 The finished pieces measures 54" square and is headed in to the tumble dryer to start the scrunching process as I type!
The quilt I just finished has a similar effect. The request was for it to finish as a very warm quilt, which means minimum quilting. The quilted squares in the center portion are set on the diagonal, and measure six inches on each side. The borders are quilted in the ditch, so they'll achieve excellent plumpiness after a dozen or so washes:


You can see the pattern well on the back - I quite like the way the corners came together, simple but strong lines:
 The finished pieces measures 54" square and is headed in to the tumble dryer to start the scrunching process as I type!
Sunday, October 23, 2011
Autumn custom in progress
I'm working on a big-boy character quilt for a lovely couple who's son is outgrowing his infant quilt. They're a devout family and have asked for an emblem on the back of his quilt. Here's the two medallion options, set in a cropped field that represents the full 54" backing (although it's the bottom of my design wall):

 And two options for the borders on the top - the first, with two borders of characters and one of green, with the striped binding:

And the second with a 1" inner border of blue and a slightly narrower green border:


 And two options for the borders on the top - the first, with two borders of characters and one of green, with the striped binding:
And the second with a 1" inner border of blue and a slightly narrower green border:

Wednesday, October 19, 2011
quilting in progress
My new-to-me quilt top is chugging right along. Some of the seam allowances were more than slightly varied, so laying flat is not really an option, but it's still coming together quite well:
 And here's the quilting on the back starting to come together:


 And here's the quilting on the back starting to come together:
 This last image shows a close-up of the base quilting - with stitches on either side of the muslin center blocks and along the seams where the finished blocks meet.
Saturday, October 15, 2011
Finish it Up! Friday
Amanda Jean over at Crazy Mom Quilts is making a new push to get things done - Finish it Up! Friday,* she calls it . . . . I am in the middle of so many big projects the idea of finishing anything seems a long, long way off. I have actually accomplished a good bit in the last few weeks, but my completions aren't quilt related.
So here's a look at a few quilts that have been completed for a bit, but haven't been measured and blogged.
Exhibit A: A Field of Ladybugs in the 'Windows on My World: Colonial Traditions' pattern. Measures 42" x 31"

Exhibit B: Jungle Critters colour block, in blue, green and yellow. Measuring 32" x 38"
 Exhibit C: Jungle Critters Colour Block - green and blue, Measuring 40" x 30"

Exhibit D: Zoo Critters, Bay Views with blue and pink, Measuring 36" x 26"

*yes, I do see the irony of posting this on a late Saturday afternoon!
So here's a look at a few quilts that have been completed for a bit, but haven't been measured and blogged.
Exhibit A: A Field of Ladybugs in the 'Windows on My World: Colonial Traditions' pattern. Measures 42" x 31"
Exhibit B: Jungle Critters colour block, in blue, green and yellow. Measuring 32" x 38"
 Exhibit C: Jungle Critters Colour Block - green and blue, Measuring 40" x 30"
Exhibit D: Zoo Critters, Bay Views with blue and pink, Measuring 36" x 26"

*yes, I do see the irony of posting this on a late Saturday afternoon!
Saturday, October 8, 2011
A back-to-front Binding Process
I took the Process Pledge quite a while ago, and then haven't done much with it - I've taken oodles of step-by-step shots but they never seemed to turn out quite right or I lost the energy for the process by the time I sat down to write it out. The gist of the pledge is that quilt bloggers will work to include in their blogs elements of a secondary guild meeting: not just show'n'tell, but how'n'why as well.
I shot a process for the back-to-front binding once before, but my recent 'It's a Girl Thing' quilt, in the blown-out Friendship Spool block was much lovelier and so I did it all over again!
This is one of my simpler graphic quilts, featuring only three fabrics on the front and the large even dots on the back, which will also form the border. Both the animal print and dots are from Michael Miller's 'It's a Girl Thing' Collection.

After piecing, sandwiching, and quilting, it's time to cut away the excess batting. I've heard of quilters pulling the backing back and using a rotary cutter and straight edge to trim the batting, but I'm terrified of nipping the backing at the same time, so I use a good pair of scissors and a bit of patience.
When I'm planning for a back-to-front binding I don't quilt all the way to the edge of the top - since those quilting stitches might appear within the binding edge on the reverse. If you look closely at the image below you can still see my edge marking, which is 0.5-inch in from the edge. I use a hera marker and I adore it - I should probably add a 'tools' element to my Process Pledge, since I can certainly wax poetic about my favourite tools! But, I digress, here's a shot of trimming batting, followed by a shot of trimming backing.

 I do use the rotary cutter and straight edge for trimming the backing. Thanks to the see-through acrylic ruler I can easily trim the backing to 1.25" excess from the quilt edge.
When it comes time to turn the backing into a binding I start several inches to the left of one corner and make a folded binding. The cut edge of the backing is folded just under the cut edge of the batting, creased, and the crease is folded onto the front of the quilt. With a 1.25" excess, this leaves the folded edge just about 0.5" in and aligns with my leftover crease (with a little wiggle-room). I use 5/8 binder clips from the office supply store to hold my binding in place.
Although we only create one crease, the process creates two folds - the crease becomes the edge of the binding fold that we will stitch on, and when we put it into place we have created a default fold on the outer edge of the quilt. When it comes to the corners, I extend the crease and fold fully to the edge of the cut backing on the right - so that the binding folds are in position well beyond the surface of the quilt. Then, in a process reminiscent of origami or gift wrapping, the tip of the corner is folded over so that what was the outer edge fold is now lined up with the edge of the top and backing, as below:

The process then repeats - fold the cut edge to the edge of the batting, crease, then fold again so that the crease aligns with the 0.5 inch mark. There may be some fidgeting to get the corner to line up properly with the bulk, but with some strategic pinning and a thin straight edge (a fat toothpick or narrow craft stick or a hera marker) you should be able to get it to lay flat. When the corner is ready, hold it in place with another binder clip, and continue around and around.


The process then repeats - fold the cut edge to the edge of the batting, crease, then fold again so that the crease aligns with the 0.5 inch mark. There may be some fidgeting to get the corner to line up properly with the bulk, but with some strategic pinning and a thin straight edge (a fat toothpick or narrow craft stick or a hera marker) you should be able to get it to lay flat. When the corner is ready, hold it in place with another binder clip, and continue around and around.


The result will be a fairly heavy, tidily clipped binding:


Then comes the fun part - very carefully topstitching that binding down. I use a walking foot, so that when I come back to the beginning there's less chance I'm going to have a bump in the seam: 

I stitch just about an 1/8 inch in from the crease. I align an edge of my foot with the edge of the crease and move my needle accordingly. When it comes to the corners, I like to rotate the quilt and stitch out to the tip and back. I really like the look of topstitched corners, plus it makes them a little more secure.

 Obviously, you should back-stitch at the beginning and end of your binding. There are a number of reasons you may find to use a back-to-front binding in your next quilt, or request one in your next commission, but probably the most important is: strength. Because the binding is one piece, there are no seams along the length and the stitching stands up to abuse better than blind-stitched traditional binding that is half sewn by hand. The modern sewing machine is called 'lockstitch' because it creates such a tight, sturdy stitch, and is an excellent choice for finishing a quilt that's going to have a lot of use, particularly quilts for children.

 Obviously, you should back-stitch at the beginning and end of your binding. There are a number of reasons you may find to use a back-to-front binding in your next quilt, or request one in your next commission, but probably the most important is: strength. Because the binding is one piece, there are no seams along the length and the stitching stands up to abuse better than blind-stitched traditional binding that is half sewn by hand. The modern sewing machine is called 'lockstitch' because it creates such a tight, sturdy stitch, and is an excellent choice for finishing a quilt that's going to have a lot of use, particularly quilts for children.
Thursday, October 6, 2011
More pink!
 There's another sophisticated little girl coming into my world and pink with elephants are going to be on the way to her!
Friday, September 30, 2011
A New (to me) quilt to finish!
One of the really great things I get to do is finish quilts for other artists. I really enjoy the mechanics of quilting (even if it does give me vulture shoulders) and find it refreshing to work on a quilt I haven't known for weeks (or months). This latest top belongs to a man who inherited it from his mother when she passed. I love that he's having it finished for her as much as I love the pattern:
 It may be a few decades old but it has a bold graphic design that's just right for a modern home. At 74" x 92" it's a perfect size for the twin bed in the guest room, a generous sofa throw for two or to lay width-wise across the foot of a king-sized bed.
 This last image is just a little brighter than real life, since those center logs (on the diagonal) are actually an unbleached muslin. For the first time in weeks the sun was blaring her brightest this afternoon and I was not about to say anything rude that might send her back into hiding. It will be finished with an unbleached muslin backing and cotton batting and quilted in a neutral cotton thread, in the ditch along all seam lines.
 Wednesday, September 28, 2011
Windows on My World
I currently have two new children's patterns available in the Windows on my World collection. The Bay Views pattern is an enlarged courthouse steps block. This features a large graphic print and two contrasting solid borders:

The Colonial Traditions pattern features a smaller focal print, also with two contrasting solids:
 These are great ways to supplement an existing nursery theme and are suitable for wall-hangings, tummy time and adventures in the stroller or car.

The Colonial Traditions pattern features a smaller focal print, also with two contrasting solids:
 These are great ways to supplement an existing nursery theme and are suitable for wall-hangings, tummy time and adventures in the stroller or car.
Thursday, September 22, 2011
Pink elephants
My pink elephants are on their way to a new home. As this is a wall quilt, it is lightly quilted in a diagonal across the center and the borders are unquilted. Hooray for elephants!


Sunday, September 11, 2011
A Superman - super quick!
So, I was perusing the old interwebz awhile ago (last week) and found a story about a Superman fan whose collection was looted by an alleged friend. You can read the story I found here. In a nutshell, the victim is a chap who was befriended by a coworker at his part-time job, who then cleaned out his lifetime collection of comics and action figures.
Seriously?
Fortunately the St. Louis, MO police have their ducks in a row and are on the trail of the missing collection. If you click the link above you can find the address of Mike's family member who has graciously nominated his mail carrier to shuttle sackfulls of fan art and thinking-of-you cards.
I cannot participate in that, because if I were to attempt to draw a picture of Superman and mailed it to him, I would probably be arrested and charged with inflicting emotional distress. So I did what any red-blooded American dork with six unfinished quilts and a looming deadline would do: I set my phone straight to voicemail and drove to the fabric shop.

 Four hours later a 45" x 60" sofa throw was born. As a quilter, it reminds me of the quickies we throw together after every hurricane, tornado or fire for teenagers who just lost everything (and delivers a stern note to use larger solid colorblocks). As a dork, all I see is a hug: a soft, machine-washable Superman-hug.
Seriously?
Fortunately the St. Louis, MO police have their ducks in a row and are on the trail of the missing collection. If you click the link above you can find the address of Mike's family member who has graciously nominated his mail carrier to shuttle sackfulls of fan art and thinking-of-you cards.
I cannot participate in that, because if I were to attempt to draw a picture of Superman and mailed it to him, I would probably be arrested and charged with inflicting emotional distress. So I did what any red-blooded American dork with six unfinished quilts and a looming deadline would do: I set my phone straight to voicemail and drove to the fabric shop.
 Four hours later a 45" x 60" sofa throw was born. As a quilter, it reminds me of the quickies we throw together after every hurricane, tornado or fire for teenagers who just lost everything (and delivers a stern note to use larger solid colorblocks). As a dork, all I see is a hug: a soft, machine-washable Superman-hug.
Thursday, July 7, 2011
Cult of Hexie
So, I have gone and gotten myself a hexie addiction. I tried to hold out for as long as possible, even after my girlfriend Namoo's workshop, but I knew sooner or later the incubation period would end and I would be infected.
This is what I've achieved so far - an overexposed shot of about 50 or so 4" hexies. These are going to be a 100 dreams charm quilt (kinda like 100 Wishes, but the fabric is all provided by me, not the little one's family). I'm kinda stoked, but didn't realise just how much of my fabric won't play with each other . . . seriously, some of them won't even talk to each other. This charm quilt thing may seriously involve me purchasing a pre-sorted charm pack before I'm finished.
 These two darlings, from my stash are trying very hard to be my favourites. Whatever layout design I choose, they will live together!
Sunday, July 3, 2011
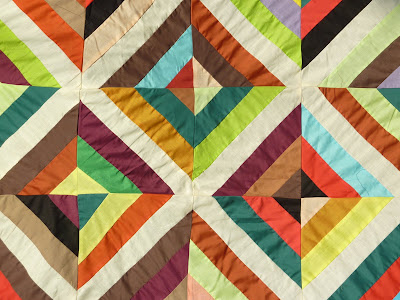
Friendship block in Progress
A friend of mine is getting married next month and I'm working on this for her quilt:
 She's a very hip and modern chick, so I've taken the traditional frienship block and blown it all out of proportion - the block shown is usually set at a 12" finished block, for persective that would make the center pebbled fabric 4" square. In my case the finished block is nearly 28", with the center motif being 9" square. Oh yea, I do like those great big blocks!
And since it's too bloody hot to go outside (specifically 89 degrees F with 49% humidity - that's right half of the air molecules I might try to walk through are water) I've gone to the old standby of the small-space quilter and taken my sample photo hanging from my shower rail!
Thursday, June 30, 2011
Squeeeeeeeeeeeeeeeeeeeeeeeeeeeeeeee!
I finally have a picture of a quilt I've finished in it's new home.
This is lr's quilt, complete with hand-embroidered patches made by her and most of the women in her family. I'm so tickled. Close-ups of a few of the dresses are below:


 and my absolute favourite (that toadstool is so stinkin' cute!):

You can find out more about this top from the artist, Jenni of Lana Bella, here.
This is lr's quilt, complete with hand-embroidered patches made by her and most of the women in her family. I'm so tickled. Close-ups of a few of the dresses are below:

 and my absolute favourite (that toadstool is so stinkin' cute!):
You can find out more about this top from the artist, Jenni of Lana Bella, here.
Tuesday, June 28, 2011
Wrap yourself in a rainbow
I've been thinking about submitting this quilt in the 54" size (shown below) and the 26" size (not yet photographed) to The Daily Grommet. A friend turned me on to them when they contacted her about a feature of her work, but I'm a little nervous about the prospect of submitting. I mean, what if they like them? Then I'd have to make five hundred by December 1st or February 1st or someother deadline that's not nearly far enough away. (It'd be awfully cool, though!)


Tuesday, June 21, 2011
work in progress - custom double
I'm working on a fairly awesome heirloom quilt right now. The top was finished a little later than expected and my Spring Greens wedding quilt was in progress so my spring timetable was a little askew. She's nearly finished and it's kinda killing me to keep the final step a surprise. You see, the gift recipient - along with almost every member of her family - have worked on embroidery and pieced patches for her quilt. It's the kind of effort that went into a traditional wedding quilt, except this time it's for a young woman coming into her own. So, at the very least I will show off my safety pins, which is all I can get away with at the moment!


Subscribe to:
Posts (Atom)
