Showing posts with label Blog Hop 2012 Pindows Tutorial. Show all posts

Monday, September 3, 2012

Blog Hop Party 2012 Pindows Tutorial Part 4 - Quilting

If you're playing along with the tutorial in real time then you should have a finished top, ready for quilting.  Which is kinda madness unless you've just forsaken your family, dining, sleep, or other regularly scheduled responsibilities for the last week or so.
 
Anyhow, if you've never made a quilt before, this may be the most onerous part of the whole process.  Your sewing machine probably came with a bag of bits something like these:
 
 
Which is funny, because if your sewing machine drawer looks anything like mine, it only has room for a couple of feet and some bobbins (and band-aids, oh, yes)


And unless you bought a machine advertising itself as a 'quilter's dream' or some other such name with 'quilt' in it, none of them will actually help with the 'quilting' part of quiltmaking.  So you will need to go out and buy additional accessories, on top of the few hundred bucks you have already spent on a machine, fabric, thread, quilt-related snacks, tea, etc.
 
 For free-motion quilting, you'll need a stippling foot.  Depending on your part of the country and the primary market served by your local sewing machine retailer, it may also be called an embroidery or darning foot, and should look something like this (less the stout pin on the left holding it up):
free-motion quilting foot
 The wire jutting out from the top rests above the screw/pin that holds your sewing machine needle in place.  Every time the needle comes up it pulls the foot up so that the foot glides over the top of your quilt as you move on to the next stitch.  This foot is used without the feed dogs and you are responsible for all aspects of the stitching - regulating both the stitch-length and the fabric feed.

Your next option, invaluable for straight-line and cross-hatch quilting, is the walking foot.  As with the free-motion foot, there is an arm that hooks over the screw/pin that holds your needle in place.  In the case of the walking foot, this angles the foot up when the needle raises, but does not completely lift the foot off the quilt in the same way as the embroidery foot.  This foot is used with the feed dogs engaged and you are responsible for shifting the heft of the quilt so that the stitching stays in a straight-ish line, but the stitch length is set on your machine.
walking foot

 The type of foot you need is determined by what kind of quilting you need to accomplish, a decision that is informed by several other factors including:
- pattern of the top
- what will be the quilt's ultimate use
- what type of batting you have chosen

As to the pattern of the top, you can get away with stippling or cross-hatching most patterns, but some just sing when they have a particular style of quilting.  The Irish chain, for example maintains an old-fashined charm when it has straight-line quilting on the diagonals; and Hawaiian quilts just wouldn't be the same without hand-stitched echo quilting.

The ultimate use and batting selection go hand-in-hand in helping determine how to quilt your piece.  The heavier the quilting the less warm a quilt will be, since there will be fewer 'pillows' between stitches to gather body heat and insulate the user.  If your quilt is going to be a summer quilt then you can use a flannel lining instead of batting and little or no quilting.  If the quilt is to be a decorative bed runner or throw on the sofa and not a primary covering for winter nights then heavier quilting won't lead to any discomfort.  If it is to be a primary source of warmth, then you'll want to leave lots of space between stitches. 

Having determined your ultimate use, you can then read batting labels to find out which batting will be best for your purpose - some batting can be quilted as much as 10" apart without bunching or bearding, other batting needs to be quilted no more than 3.5" apart, otherwise you'll have a very lumpy quilt after ten or twelve washings.

A final consideration is the thickness of your batting in relation to the size of your quilt and the size of your machine.  Quilting without a frame requires you roll up your quilt to be able to stitch down the middle . . . . you don't want to be using extra-loft batting for a twin-size quilt if your machine has a 4.5" throat . . . .

A few practical words about quilting: take your time, start from the middle and take a break when you become frustrated.  Always start with a fresh sharp needle, a full bobbin, and check your needle position is correct for the foot you are using.  Make sure the feed dogs are in the appropriate position.

If you are free-motion quilting, check your tension from the bottom stitches after your first foot or so of stitching.  Remeber that free-motion stitching is a little counter-intuitive, since the speed you manually move the fabric is not directly related to the speed at which the needle is moving up and down.  It takes practice, but generally you'll find that having the foot control between half and two-thirds depressed will move the needle fast enough for the speed at which you will move the fabric.  If you move the needle too slowly you are more likely to break the needle, since you'll be creating extra tension on the horizontal axis. 

With the walking foot you'll be using the feed dogs and the automatic stitch length, but you will need to keep an eye on the weight of the top.  Keep the top moving freely, so that it doesn't drag or pull on one side. 

And my last little tip of the day, keep a pair of tweezers in your sewing apron, drawer or tool caddy on the machine.  Pulling weeds is never enjoyable, but a good pair of tweezers will make it easier!
pulling weeds
 
After quilting, you'll need to trim and bind your quilt. Since I've already published a post on back-to-front binding, I'm going to ask you to look here, rather than reinventing the spinning wheel.

I couldn't leave well enough alone, so I used both straight-line and free-motion quilting for my finished sample. Using the walking foot, I quilted on either side of the sashing, starting with the main 2.5" strips, then the 1.5" strips. Then I changed the foot for the stippling foot and stippled only in the white patches of the pinwheel blocks. If you want to be high-falutin' you can explain this to your non-quilty friends as a using texture to create an alternative expression of negative space, since negative space is usually a solid or blank, and in this case the negative space of the texture is actually the printed patches. It also makes the prints pop!
There's a few short hours left of 3d September, if you have not yet entered to win a quilt kit to make your own pindows quilt, do so on this page.
 
 
Finished Pindows Quilt

For additional parts of the tutorial, visit these pages:
 
For additional tips, visit these pages:

Sunday, September 2, 2012

Blog Hop Party Pindows Tutorial Part Three

So far in our Pindows tutorial we have created a basic pinwheel block from HSTs (Half-square triangles), sashed them into a windowpane block of four pinwheels with 1.5" sashing, and now it's time to sash them all together into a finished top. 
 
For this we'll use the 2.5" sashing, sewing in two rows (as we did for the windowpane block), then sewing the two rows together with sashing between them, as below:
 
 
Just as when finishing the blocks with the smaller sashing, pin more than you think you need to, giving extra care to the seams.  Personally, I press my seams into the sashing (away from the blocks), this way you see the seams as a white border within the sashing, but they are much, much easier to quilt through, over and around. 

When you have your sashing completed between your four window pane blocks, use the additional 2.5" strips to create a border around the whole piece, which will finish your top like this: 

And congratulations - You've finished a 40.5" quilt top!  And as soon as it's actually quilted, you'll be able to use it to keep your legs warm, or gift it to an inquisitive toddler.

You should use a minimum of 45" square batting.  Fortunately, some batting salesperson many years ago decided that infants in cribs need a quilt that was batted at 5' long by nearly 4' wide (obviously a man - every woman out there knows you're hard-pressed to find a baby who comes out longer than two feet!), so it is easy find pre-packaged batting that will fit your need for this quilt.
You'll also need a backing fabric that is wider than the quilt top, at least 45" as well, all though 50" might be easier for a first effot.  If you're quite confident in your basting and quilting you can get away with a 45" width-of-fabric that is not pre-shrunk.  As the charm squares weren't pre-shrunk you will have a bit of shrinkage in the top, so a little in the backing won't go amiss. 

To the process of basting:  essentially you are just laying out your backing fabric (face-down), your batting, and then your top (face-up).  Since this is a smallish top, you may likely have enough table space to lay it out; if not, use whatever well-washed smooth floor is available.  I have the good fortune of a collapsible craft table, the top of which (with my cutting mat) is just slightly thinner than jumbo binding clips, so I can clip my backing to the table to keep it taught while I'm working with the other layers.  If this isn't an option, then masking tape or painter's tape will do to keep the backing straight and taught on your surface.  Also, if you're using an antique dining table you should put down your cutting mat or other protective surface before you go digging pins into it . . . 'cause that could leave a lot of explaining for you!
backing clipped to craft table
 After securing your backing, evenly spread out your batting, and then your top.  Depending on the type of packaged batting (if that's what you are using), you will have creases or folds that will need to be gently smoothed out.  Lay all the pieces out so that your backing and batting are a few inches wider than your top on all sides, don't line up two sides of your top evenly with two sides of the backing and batting. There are two reasons for this: first, there tends to be some shifting while you quilt and you don't want your top running off the batting as you work; second, I'm going to recommend the short-cut of a back-to-front binding.
layered quilt ready to baste
 Basting (v) - pinning the dickens out of a quilt sandwich in hopes that the backing won't crease and the top won't lump between now and when you're finished.

Once again, there are as many ways to baste as there are quilters, and the good news is the quilt police have been on strike since the stuffed polyester applique craze of the 1970s and nobody is going to show up and tell you you're doing it wrong or that you are an embarrassment to all the good decent quilters in the world.  You're only wrong if your method doesn't work for you, and it's only an embarrassment if you get up from your table to answer the door and realise you have basted part of your blouse to the quilt.  If this is your first quilt and all you have are straight pins, then use those - you don't have to go out and buy curved quilter's safety pins.  Be careful, though, as you are quilting, since those points will seek out every opportunity to scratch, jab, stab, and other wise would you as you are quilting. 
finished quilt sandwich, basted with curved safety pins
 Personally, I am quite fond of the curved safety pins, so that's what I've used for this project.  That's all for today - go enjoy your dinner!

If you haven't yet entered for a chance to win a kit to make this quilt, and you're reading this before the end of the day on Monday, 3 Septebmer, click over here to enter for a chance to win. 

For additional steps in this quilt top:
Part One
Part Two

For tips on this quilt:
Part One
Part Two

Friday, August 31, 2012

Pindows Tips part two


Welcome Back!  So far we've had tutuorial steps on completing a pindows block with four pinwheel patches and 1.5" sashing.  Our next step will be to show the layout and final sashing/borders.  But first, time for a break to talk about tools!

The design wall can be a great help, particularly when making a scrap quilt, as it gives you a good chance to step back and see if your lights and darks are playing well together.  As in this picture, it also gives you a chance to decide what kind of quilt you're making (obviously I went with pindows, with extra sashing, instead of what you see here!): 


There are some fairly posh design walls you can buy that feature extra thick flannel and a pop-up frame, but that's not something you need to be a great quilter.  Some of my favourite quilters (who are popular enough to have their own books in print!) still lay their quilts out on the floor, particularly the large ones.   Design walls can vary from the basic (like using the batting you bought for the middle of your quilt on a shower rod as a design wall) to the extravagant (like buying a $200 pop-up model that comes with it's own stand, case, and famous designer name).

For a design wall that hangs on the wall, I like to use Warm & Natural needled cotton batting.  It's thick, strong and has a neutral oatmeal/beige colour that doesn't seem to detract from anything I've put up yet.  Any strong fuzzy fabric will do - batting, heavy duty flannel, even the flannel back of a vinyl tablecloth.  (The only caveat I will offer to the tablecloth method is to make sure you buy a good one - cheap ones don't have a thick enough layer of flannel fuzz on the back to work well.)  If you have just a little wall space that you don't want to permanently turn over to quilt design, you can hang your design material with 3M (or similar brand) repositionable hooks and binder clips, like so:
temporary design wall with removable hooks
 
If you have bookshelves all over the place (sheepishly raising hand and looking at the floor) you can also put them to double duty as design surface.  The pic below shows a portable roll-up design surface made from a 1" core of pvc piping, cut to length, to which a flannel-packed tablecloth was affixed with duct tape.  I can unroll it and rest it on the top edge of some larger books jutting out from the top shelf, and when I don't need it I can roll it back up and tuck it on the back of the top of the bookshelf.

Portable roll-up design wall made from pvc and flannel-backed tablecloth
 Next, a few words about stilettoes, which are not just footwear famous for damaging parquetry floors.  I think a good strong steel stiletto should be in every sewist's workbox, but only because I have an inordinate fondness for poking holes into things!  In the case of basic quilting you will likely use stilettoes for two things - lining seams up as you stitch, and quilting over or around design elements.  Just like design walls there's a world of stiletto supplies out there from the basic to the extravagant: bamboo, steel, olivewood, even naturally shed porcupine quills all find there place in the sewing room.  For the basic needs, you probably already have what you need in your home - your two basic requirements are that it is small enough to do the job, but large enough that you can always see it and will not risk breaking your needle trying to stitch through the device.

A stout pin can do well to make sure your seam stays tucked under the foot:

Likewise, a clean toothpick - they're not just for checking to see if your cake is done:
And if you don't, for some reason, have toothpicks laying about the house, you may find that your creative endeavours have been so great it's simply not possible to also make your family dinner and you'll be able to pick up a few toothpicks on the way out of your local Italian restaurant. 

And that's part of how quilting gets it's reputation of being such an expensive hobby!

Wednesday, August 29, 2012

Blog Hop Party Pindows Tutorial Part Two

If you've been playing along with the tutorial, you should have one pinwheel block created, which will become one window pane in your first Pindow block.  To continue, repeat part one with three other pairs of complimentary prints and six white squares, so that you have a total of four pinwheel blocks that play well together (colour-wise).
 
Next you will use one of your 1.5" strips to create the window pane sashing.  Sew pinwheel blocks in pairs with the sashing between, pressing the seams in towards the sashing:
 

Next, stitch another 1.5" wide strip between the two rows:

When sewing sashing to pieced blocks, I pin excessively and then stitch with the sashing fabric on the bottom and the pieced backing on the top. Even though the sashing fabric is much narrower, doing it this way helps me to assure that the seams feed under the stitches without folding open.  Using a small stilleto and lots of pins helps with this step.

You should end up with a windowpane block that looks like this and measures 17.5" square:

After finishing this block (and having a congratulatory cuppa) repeat part one and two until you have used up 32 charm squares and created four pindowpane blocks like the one above.  (Note: your top is almost done!)

Additional tips about design walls and stilettos will follow.  Any other questions, please post at the bottom of this page.

Tutorial Part One is available here
Tips Part One is available here

If you haven't yet signed up for a chance to win a kit to make this quilt, visit here

Tuesday, August 28, 2012

Blog Hop Party Pindows Tutorial - Tips

There was a question on Part One as to the number of white squares you'll need.  If you are working this project from scraps, you will only need 32 printed 5" squares and 32 white 5" squares.  Since I will be giving away a pre-pack of 40 printed squares I will also be giving away 40 white squares - that way you can practice with some of your least favourite prints before stitching into the ones you adore.

In the picture below there are two points to look at - one is the little blue triangle off to the left, and the other is the mess of tension down the stitching.  The little blue scrap is a remnant from a binding that has been repurposed as a leader.  Leaders, also called spiders, are just any bit of fabric you have on hand that you stitch through before you start the main patch.  If you find your first few stitches (or back-stitches) are pushing the edges of your fabric into your throat plate, stitching through a leader first can create a good foundation so that you have good tension when you move on to your patch.    And speaking of tension, it's a bit of a mess in this first picture:
 
 If your tension is off by just a little bit you may be able to gently tug from both ends of your stitching to even it out.  And by gently tug, I mean gently - no harder than you might tug a puppy's ears when you're playing!  If you tug too hard you will either break the stitches, or distort the grain of the fabric, both of which fall under the heading 'not good things'.  Your machine's manual should have trouble-shooting tips in the back for adjusting your top and bobbin thread tension.  If all your efforts adjusting various knobs and wheels have failed to even out your thread tension, take all the thread out of your machine, go have a cuppa, come back, re-thread with a new bobbin and try again. 

Proper tension should look like this:

Trimming - If you didn't trim the points of your blocks in Part One, step four when you cut them in half, you should really do it when you square your blocks:

 If you don't trim your corners, when you try to sew all your half-square triangles together you will wind up with a little haystack like this (which is a pain in the tuchus to quilt over):

If you missed part one, visit here.

If you haven't yet signed up for a chance to win a kit to make this quilt, visit here.

Monday, August 27, 2012

Blog Hop Party Pindows Tutorial - Part One


Hello, and welcome back!  If you're just joining us, welcome to part one of the Pindows Quilt Tutorial.  The Pindows pattern is a four-square, straight set windowframe layout of pinwheel blocks.  Let's start with your supplies list:
- 40-piece charm pack
- 7 strips 2.5" x wof white
- 3 strips 1.5" x wof white
- marking tools: straight edge and disappearing ink pen
- sewing machine (or hand needles)
- rotary cutter or scissors
- white thread

Step one: from your charm pack, select coordinating pairs of fabric.  If you are using two identical 20-piece charm packs, you may choose matching pairs so that your pinwheel blocks are all of one fabric, rather than scrappy. 
You will need 16 pairs of charms for this quilt.  If you have never made half-square triangle blocks, you may wish to use some of the fabric that won't be in the quilt for your practice blocks. 
Step two: lay a charm square right-side up on your worktop, layer with a white square and draw a line diagonally with your straight edge and a disappearing-ink fabric marker or very faint pencil line:

Step three: pin your fabric together and stitch 1/4 inch on either side of the line you have marked

Step four: using your rotary cutter or scissors carefully trim the corner at each end of your stitched lines, then cut down the line you have marked.
 
 Step Five: Carefully press open each half-square-triangle you have just cut apart.  If you have a marked pressing pad, this is a good time to put it to use.  Do not iron with a sweeping hand, since will distort your blocks.  Instead, lay the HST on your ironing pad white side down, lift the tip of the printed fabric and gently press open with your hot iron.  Go slowly and this will press the seam allowance towards the printed fabric.  Repeat the pressing with the other half of the pair you just stitched, then repeat steps two through five with the coordinating fabric you have previously chosen.

Congratulations - you should have all four patches for your first pinwheel block ready to go! 

Step six: trim your individual half-square triangle blocks to square (if necessary), then sew in pairs, matching a white and print edge as below:
Press your newly sewn seam towards the same dark print fabric. Since you will be rotating them to make the pinwheel, you can lay them out facing and pressing the same direction here.

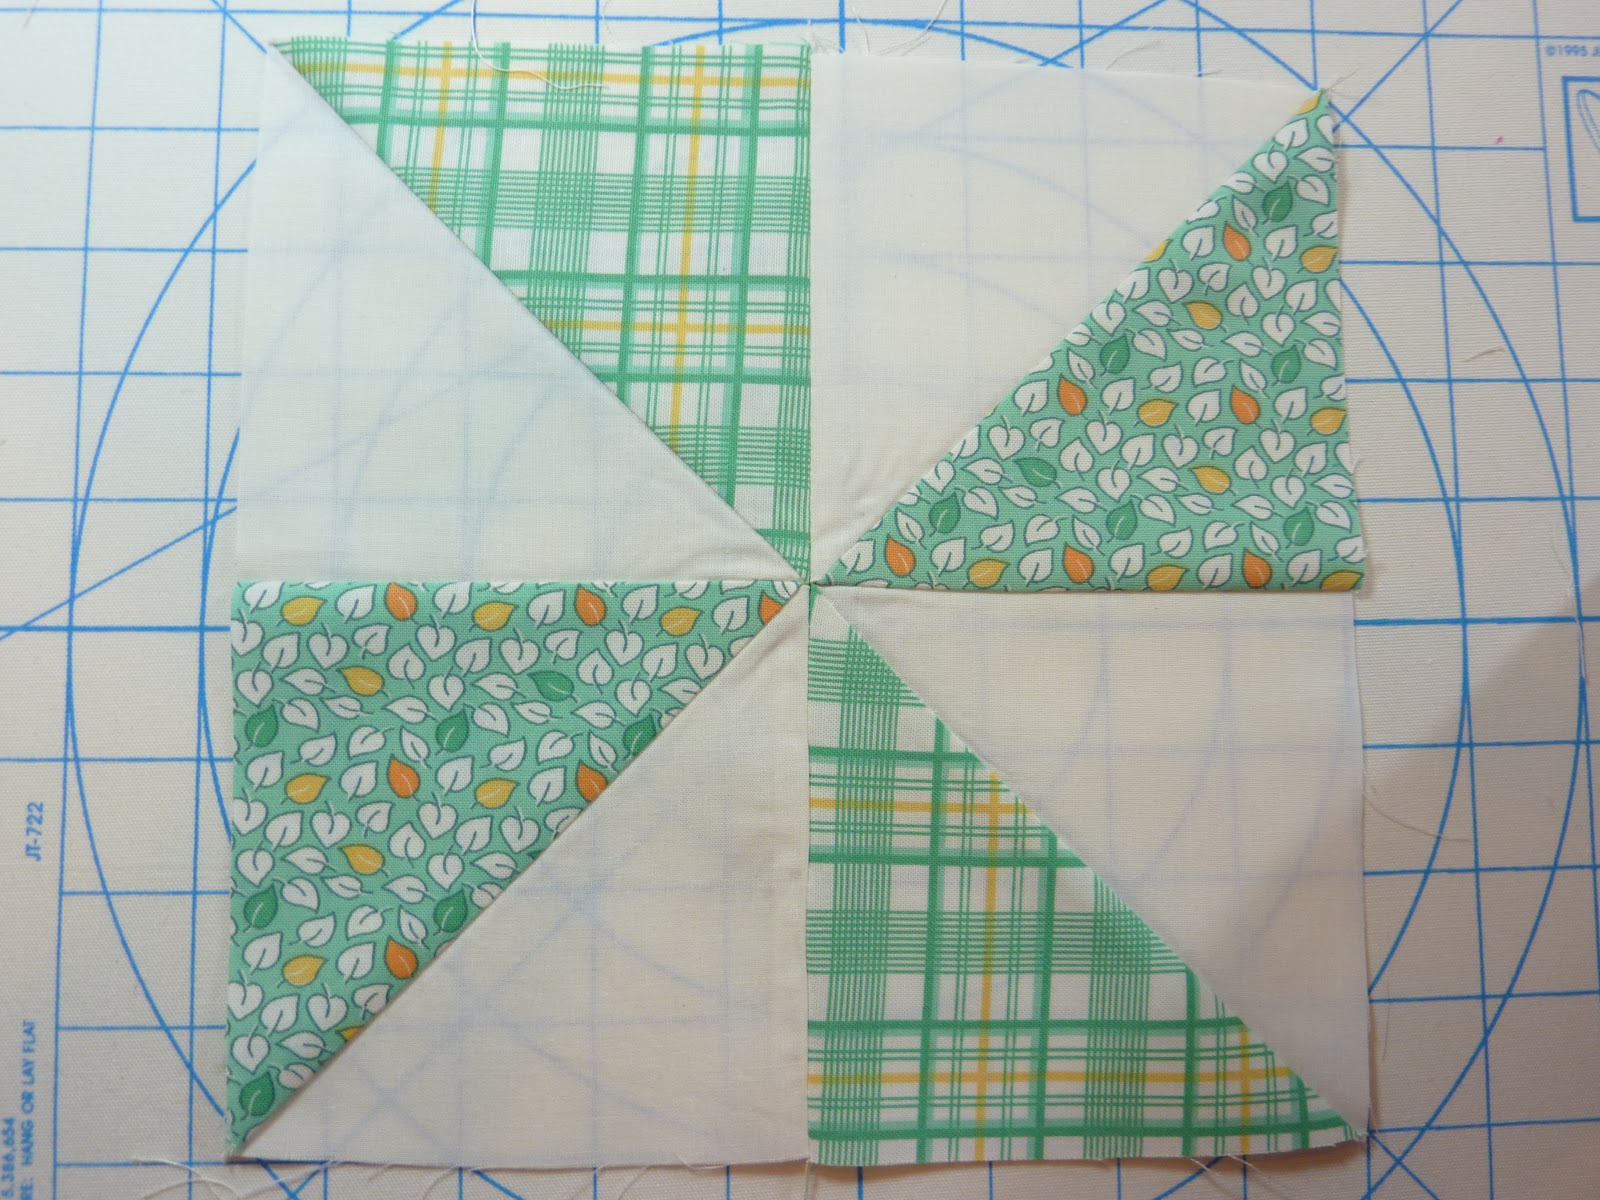
Step Seven: rotate your blocks and line up your seams as below:

Pin - more than you think you need to, especially if these are your first pinwheel blocks!  Carefully stitch 1/4 seam down the length, removing your pins as you go:


Step Eight: press your blocks open.  When doing pinwheels I always press the final seam open, but that's just a matter of preference, if you wish to press it to one side, go for it!

Congratulations!  You have completed your first pinwheel block for our quilt! 

Tips for this section will follow in a new post.  I you have an specific questions, please post them in the comments below.  If you are just joining us and would like to enter to win your own pinwheel quilt kit, please comment for entry on this page.

Creative Commons License
This work is licensed under a Creative Commons Attribution-NonCommercial-NoDerivs 3.0 United States License.